For this tutorial, I will be using Adobe Photoshop CS3,
however you can do this in whatever art program you may use and
should still be able to find each feature somewhere,
if you don't already know how to do it there.
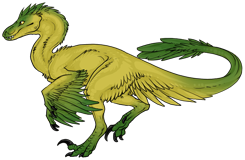
I will be using my item 'Spiky Blue Collar' for the species
Sinornthosaurus to demonstrate.
It can help with making any item for any species.
Step 1
First off, you will want to save or copy an image from the site
of the species you wish to use and open it in your art program of choice;
in this case, Photoshop. From here, you can draw on your item.
Make sure you do this in a new layer. To create a new layer,
click the 'New Layer' button on the 'Layers' Window.
If this window is not already open, go to Windows > Layers.
The layer will appear above your image of your dinosaur, as shown bellow:
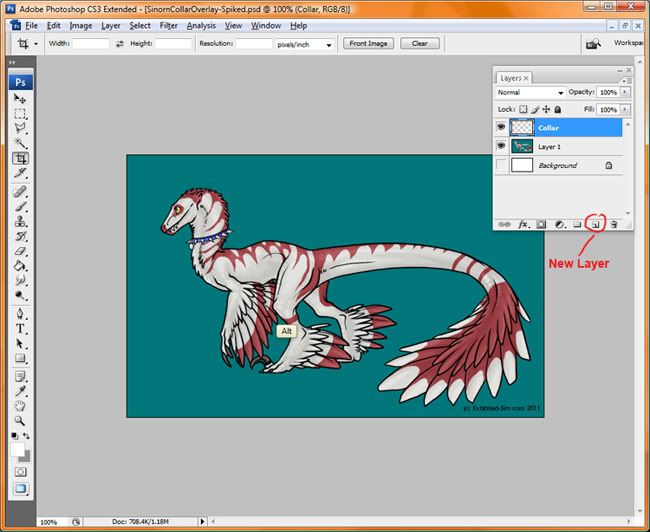
In this case, my 'Spiky collar' was drawn on to the new layer above my dinosaur,
at the right place around his neck. You MUST keep it in this spot in order
for it to show in the same place on this species of dinosaur when you upload it.
Step 2
Now that you have drawn your item, it's time to save it!
Before you do so, make sure you click the 'Hide' buttons (shown bellow) to hide the white background layer (if applicable) and the image of the dinosaur you used as a guide:
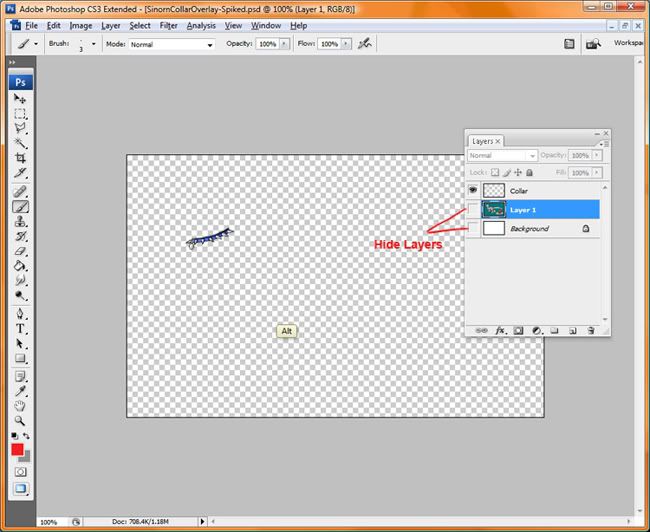
You will be left with something similar to the above. Notice how the background is now all those little squares? This means it is transparent! This is how your dinosaur will show through when the collar is placed on top of them.
Remember, DO NOT move your item at all and DO NOT resize the image at all. The image must stay the same size as the dinosaur image to keep it in the correct place when you use it on your dinosaur.
Step 3
It's time to save your image and preserve the transparency needed for this to work. You will have to save your image as .PNG to keep the transparency aswell as the colour quality.
In photoshop, go to File > Save For Web and Devices :

Which will bring up another window that looks like the one shown. Make sure your settings are as I have them bellow; PNG-24 (to preserve your colours) and 'Transparency' selected, which is should be already. If not, click the box to enable it. Also make sure you are in the 'Optimized' tab. Which again, should be by default.
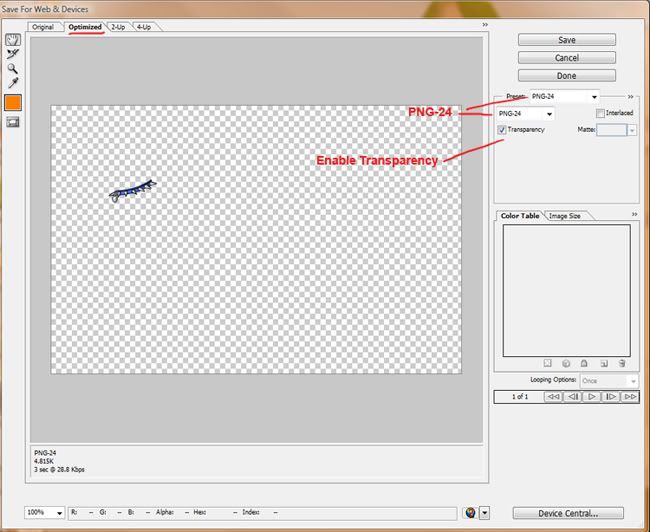
Once that is done, save away!
Step 4
Next, you need an 'Item' file, this is the small 100x100 thumbnail that will display in the overlay shop as a preview to what your item is. It doesn't have to be anything fancy and could just show an important part of the item if you can't show the whole thing. The design of this is entirely up to you! All that is required is it MUST be a .PNG image (the same as your overlay) and it MUST be 100x100 in size; which you can make it be when you create your new file.
For my collar, it was small enough to fit in to the 100x100 image, so I used the item itself as a preview by selecting it in my 'overlay' file, Copying it (Edit > Copy or Ctrl+C) and then Pasting it in to my new 100x100 image. (Edit > Paste or Ctrl+V)
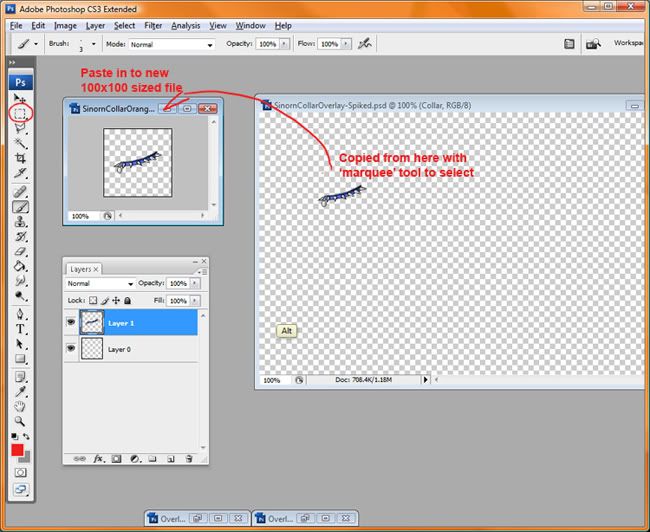
Transparency is not required here, however should you want it to be transparent, save it in the same way you did your overlay in Step 3. Should you want to save it as a normal .PNG file, flatten your image first (Layer > Flatten) and then save as a .PNG file.
Step 5
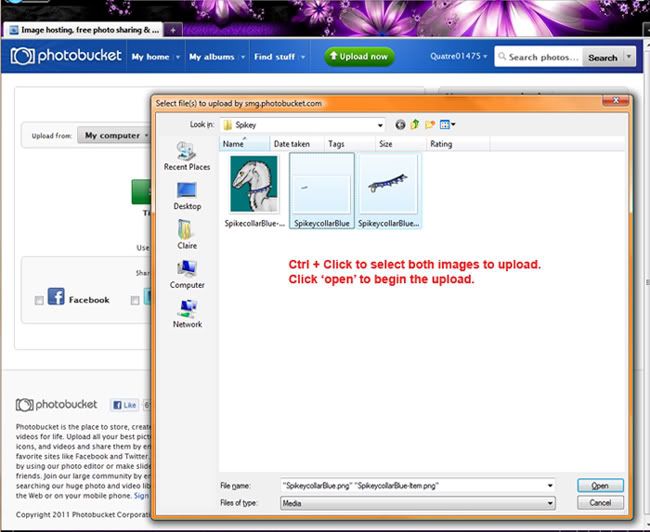
Time to upload your overlays! These can be uploaded on any image-host site, the one I will be using is Photobucket.com. If you do not have an account in any image host site, you may want to sign up with one such as Photobucket, which is completely free and very reliable in my opinion. Otherwise, whatever you are using will still work and you should be able to find what you're looking, they will have the same things Photobucket has that is needed.
 Step 6
Once uploading is done, head to the pages of your Overlay and your Item. You will see a box near the right-hand side that looks like this:

We are interested in the link in the 'Direct Link' box which is underlined above. Click inside the box and Photobucket should have it copied for you (it will say 'copied' in the box once click.) If it doesn't say that, or it hasn't work, highlight the link and then Right-click > Copy (or Ctrl+C)
You will need the direct link from both of your images, so keep these windows open or the links handy somewhere for the next step.
Step 7
You're almost done!
Now it's time to head back to Exhibited and go to your Overlay Panel, which is the paint-splattered cave on the 2nd map. Here, you will be using those direct links to show off your great new clip-on to the moderators. You can preview how it looks first and make any adjustments before submitting it, on either a black or white version of the chosen species:
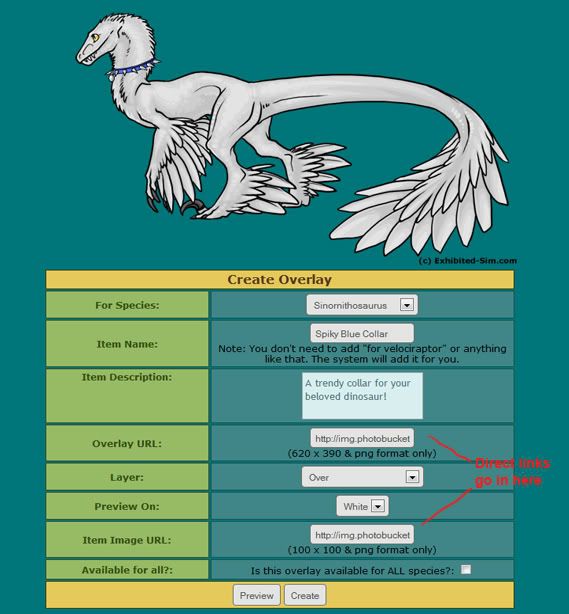
Here is what each selection means and its use:
For Species: Select the species your overlay is for. (or if you are selecting 'Available for all', you can use this to still preview your overlay)
Item Name: The name of your item goes here. It can not be the same name as any other item on the site. Should you do this by mistake though it will alert you once you submit it and the form will still have your details, so you will not have to fill it all out again.
Like the note says, you do not have to say what species it is for in your item name. So when I put 'Spiky Blue Collar' the system automatically made it 'Spiky Blue Collar - For Sinornthosaurus'
Item Description: Create a short description for your overlay.
Overlay URL: This is where those 'direct links' are needed that I showed you in Step 6. Here, paste the 'Direct Link' for your Overlay image.
Layer: Select how you want the overlay to appear on your dinosaur.
Underneath - Will appear under/behind the dinosaur.
Underneath Markings - Will appear under/behind the markings of the dinosaur.
Over - Will appear infront/on top of the dinosaur.
Preview On: Select the colour of dinosaur you want to preview your overlay on.
Item Image URL:This is for your second 'Direct Link', paste in the 'Direct Link' to your 100x100 preview of your overlay.
Available for all?: Select this if your overlay is suitable for all species. (Please note this will not mean if you made it for a Sinornthosaurus, it will adjust automatically for another species such as Velociraptor, you would have to make collars for each individual species. However, if it is an item such as a background which will display the same for every species, then select this option.)
Step 8
Once you have filled out the form and everything looks good, click 'Create' and
your overlay will be submitted! You will get a 'Success' message once it has been done. It will now go to the moderators for approval. If it is accept (or rejected), you will get a message in your inbox saying so.
Once accepted, you will be given 1 copy of the item for yourself. You DO NOT have to submit multiple forms for more of your item, you will be able to distribute more in the Overlay Shop. You can, however, sell on your only copy right now if you wish, but that is entirely up to you!
And that's that, have fun making your own overlays!
Posted: 21/05/2011 @ 2:36 pm Edited on 12th Mar 12 @ 9:44am by Clara


