Add new Bookmark
Do you need some help? Enter your problem or question below and an Exhibited Guru will get back to you. If you have a serious problem, it might be best to ask a moderator instead by selecting "Mod Box" from the drop down. Remember, this isn't for reporting bugs.


Guides

A list of helpful guides can be viewed here!


EX Art Overlay Tutorial
First, be sure to check out the Overlays 101 Sticky if you have any questions about overlays in general and less how to do the markings/items.

I use Photoshop CS3, but I'm sure there are similar things to the tools I use in gimp and other programs.
However, it does require a program that can handle layers.

I will try to go into detail for people with less experience, but please let me know if you need me to elaborate on any step.


How to make Marking and full Recolor Overlays
Markings are most easily done by editing the existing dinosaur images.

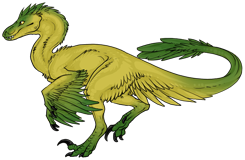
For this tutorial, I will be making a complicated full-body overlay for coelophysis to show some different ways people could use to make markings.

Step 1 Choose Your Color(s)
Go to the Custom Tool in the lab and make dinos in the color(s) you want the markings to be. Save at least one to your computer as a .png file. If you need more than one color, the rest can be copy/pasted over.

Save.png

In some programs copy/pasting .png images will turn the transparent parts black.
It is very easy to fix though. Ctrl + Left click (or right click -> Select Pixels) the mini-image next to the layer name on the layer with working transparency. That should select everything that is not transparent. Invert the selection with ctrl + shift + i (or Select menu -> inverse.) Then click the layer with the "broken" black background and cut (ctrl + x or Edit menu -> Cut.) This should leave behind the dino with the black backgound gone.

BlackFix.png
Hurray!
When doing a lot of different markings, or one really complicated one, this is faster than saving a bunch of images and moving them all.

------------------------------------------------------------------------------------------------

Step 2a Create a marking by erasing.
The easiest way to create a simple marking is to simply erase the parts that you don't want to be part of the marking.
It is also helpful to have another dino layer under what you are erasing so you can see what the marking looks like when used.

Erase.png
At this point I've added a background on a different layer.

Once you are finished, turn off or delete all the other layers and save it as a .png image. If you are doing something similar to what I did, you should end up with a strange floating marking missing important parts of a dinosaur. This is good. :D

CoelophysisBelly.png

------------------------------------------------------------------------------------------------

Step 2b Create a marking by drawing and cutting.
It is really hard to do complicated or detailed markings by erasing. This method doesn't work with gradient markings that have soft edges like the belly marking.

Make a new layer over your dino and simply draw the marking on over it. Once you have the markings were you want them to be, ctrl+click the marking layer's little image to select your blobs, and invert the selection. Now select the dino image that is the color you chose for that marking and cut. What you should be left with is the bits of the dino that weren't cut, bits in the shape of your marking.
Save it the same as the eraser method.

BeforeAfter.png
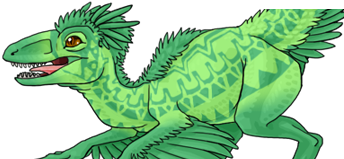
Once it's selected, inverted, and cut out of my white coelo layer I'm left with a patchy marking.

------------------------------------------------------------------------------------------------

Step 2c Create a marking by drawing and using a clipping mask.
My favored method by far.

Beneath the dino layer, create a new layer. Right click the name of that new layer, and select "Create Clipping Mask."
The dino layer should appear to vanish, but it is still there. Anything drawn in the new layer will reveal the masked layer above it. This means you can use gradients and draw shapes that are more complex than you could with erasing. Anything that goes "outside the lines" will reveal the color you are drawing in, but this is easily fixed.
ClippingMask-1.png

To get rid of the color outside the lines, ctrl + click to select the dinosaur layer and invert the selection, and cut on the marking layer. You can right click and Merge Down clipping masks so you have fewer layers if it's a complicated overlay.

------------------------------------------------------------------------------------------------

Step 3 Upload your marking
I see a lot of questions about how the overlay system works, so I thought I would include how to finalize and upload your marking to have it made into an overlay.

....When I get back from lunch. >_>;;

Post: #132401
A quick question for you; how long does it usually take for you to do an overlay like the glowing one?
Post: #132629
Wow, awesome! I bet I'd suck at making them, but thank you for taking the time to write this up. A lot of people will benefit from this. :)
You're every wonder in this world to me. -
Post: #143127
^^ thank you... One thing... second tutorial is good but you explain way to much in words... can you add more visual instructions please? in the top one you start to then you just show us what the dino looks like at every stage which is great but tottaly useless for gaining information... what do the tools look like that we are using? where are they on our screen? What opasity is your brush set at? even something simple like this= http://th03.deviantart.net/fs70/PRE/i/2011/169/5/3/ferretwip_by_ripjawwolffang-d3j7v4k.jpg shows more... If you curcle the tools it would be even better!

XD especially for the second method... first method is easy... masks are basic... but i cant follow you on the second...

XD will you part with your pre made bases? lemmy steal em off you that is? im not being lazy i just dont get it...

Post: #143130
Actually Beyond, when I have time I'm going to replace the second method with something else entirely (And add a couple fixes to the first now that the lab images are transparent.)

Since all the species are in the lab now, and the second method is annoying and doesn't produce perfect results, it isn't needed anymore. :D

Would people be interested in seeing how to shade items so they match the ex artwork for the second one, or any suggestions?

Post: #143132
Yep!

Oh wait no!
how to make items non pixilated without looking blurry!


Eddit: XD yeah it was kinda a crazy amount of work to do for a base XD

Post: #143133
That would be awesome! Could also do a new tutorial on how to make glowing markings and eyes?
Time is +2 hours exhibited time. the Internet is like a sea and people are like jellyfish if they don't like each other stinging each other ain't going to do anything they need to float away to be better. - Spotters
Post: #143134
O.o glowing markings are easy... I can tell you that now ^^ anything you want to glow you simply make a new layer under it (EDIT: or over it depending on how you want it to look), set the opacity of the brush to 3 and go over and over it until its perfect with the darkest glow in the middle... You can then blur it so that it looks more like a glow and less like a squiggle...
It should come out like this:

Dose that help?
If this is the look your going for and you dont understand ill make a tutorial... there are lots of ways to do this and im sure Ankokou has another way but he/she shouldn't have to do everything if others can pitch in right? if im out of line or whatever anko can slap me XD

Post: #143141
Sure, I'll do items, clean lines, and stuff. I'll do a better section on glow stuff too.

There are more complicated glow things too, like the tail static I have in the shop. Lighting effects and stuff.

I personally feel the method you posted Beyond, while it works, makes a more flat looking. (That spino does look cool though.) I personally like to use a couple colors, white, and even some effects for movement and stuff. I also like a sharper, unblurred glow, but that's opinion. ^_^
Like I said, I'll add some stuff that is harder to do, like lightning.

Anyway, maybe even later tonight I'll work on fixing this. I've been putting it off for long enough.
In the meantime, a quick trick I've found with the lines is to draw bigger and resize it. I like make the item lines 50% larger than they will be when they are done, and shrink them (for shading, normal size is fine.) I think I use a 3 pixel brush with a mix of shape dynamics and no shape dynamics. I'll explain it better later. XD

Post: #143143
XD yeah i tried that it makes things go pixilated O.o theres a million tutorials on it and iv yet to see a method that works XD I even tried it on that ferret picture XD fail!

I like blury glow... i can do things the other way to but glow is by nature blury... its not like a sharp light casting out of something like RAWR here i am the high beam! its a glow... soft gentile... glow... XD personal opinion XD

Post: #143145
No, I agree, it is a soft, gentile glow (minus the lightning example,) but I do it differently. I like to put some white/lighter color at the source, use more than one color, and don't use the blur tool. Just the brush tool with the flow turned down to 30 and less with pressure sensitivity.
I think it gives the light more depth, but your method is fine too. There isn't a "right" way to do any art, everyone can have their own style. :D

Haa, it's hard to explain. DX
I'll post something eventually.

Post: #143146
XD see how bad i am at getting my opinions across? XD i have to say 'RAWR here i am in high beam' for people to understand me XD no wounder im always in trouble for fighting online when someone takes me to seriously...

XD I use a mouse XD hahaha im not all that rich as to have tablets XD well i have one, but not the money to get it fixed XD

Eddit/Note: Above is a good example of me not frazing something right and getting in trouble. Not having a stab at you, just having a stab at the stait of my own wallet right now XD

Post: #143545
I don't have a tablet either but I'm hopeing to get one very soon when my mom finally brigns me to the bank to cash my three checks from work XP. I'm thinking a webcom bamboo I think thats what its called atleast XS.

I'll try your method of glowiness ^^
Time is +2 hours exhibited time. the Internet is like a sea and people are like jellyfish if they don't like each other stinging each other ain't going to do anything they need to float away to be better. - Spotters
Post: #143550
Nah, I'm not offended, but I am anything but rich. XD
I'm a broke college student actually, I usually put away about $20 a week and whatever I make selling art for my spending money (Which, I guess if I'm making money selling art a tablet is a good investment!)
I just save it up slowly, baring emergencies, and eventually get what I want. Eventually. >_>;


Too, there are "cheaper" tablets. Mine was $90 brand-new, which isn't bad. It's just a little 4"x6" Wacom Graphire from Amazon.com, and works fine for everything I do. ^_^

Post: #143891
When I copy and past a custom lab dino into photoshop elements, the background is black instead of the blueish-green and it's not transparent. How do I get the background of the dino transparent because when i use method #1, the black background becomes a part of the overlay pattern if I go outside onto the black background.
Post: #143958
*waves hand around for a second time* wold, it doesn't matter if that happens ^^ when your done select all the green in the bottom base layer. select the layer your working on again and hit delete... All gone XD


my tablet is a bamboo... but its as crazy as a two bob watch! it is like... "Oh i feel like making a line at the top of your screen now!" *draws line* "Hahaha wasn't that fun? while you erase that ill erase something at the side of the screen you where working on! Isn't this fun Beyond?" XD and that's how i went back to using a mouse XD

Dare i say i may be broker then you? XD i OWE money XD $5000 its costing me to start my own business which wont be set up untill about 2 months... XD yes... you cant get much more broke then me right now... Thank god i live at home or i would starve to death XD

Post Reply